
New Technologies in Banjo Building and Prucha’s New Spirit Banjo Line
 It’s remarkable how things have changed over the past forty years. I was fifteen when I made my first banjo. Imagine the entire drawing process back then—pencil, paper, carbon paper, tracing paper…many times over and over. Today we have computers and modelling programs—you don’t even have to measure, you can just send your files to CNC [computer controlled cutting], test it, correct, and resend the repaired files… I know there are luthiers out there who don’t appreciate the new technologies, or don’t even want to talk about them, but 99% of all luthiers purchase neck blanks, inlays and other parts and components already produced with the help of these technologies and tools. And I want to clearly state that these new building technologies have brought my own business, Prucha Banjo, to a higher level. My friend, and builder of great guitars, Franta Furch, introduced me to these technologies, showing me how to cut pearl with lasers. Since then we have ordered our inlay cutting work for our Spirit line at Furch Guitars, and the results were an immediate improvement.
These new technologies have made things possible for luthiers that were unthinkable in the past. Even at the beginning of the last century, copy machines such as polygraphs and other simple, manually operated machines were used, but today, CNC lathes and CNC milling cutters help to upgrade the quality of our work to the highest standard. Even a small workshop like ours can’t operate without these technologies. It is a must but also a big challenge. Modern day luthiers have to learn and master a new branch of the craft, which is basically a new field of industry. Modeling and drawing in modeling programs, and curve transfer into machining programs, are quite sophisticated operations, but these days you can’t work effectively without them. Sure, being a tool machinist myself, I know I could make everything manually right from the beginning - cut, carve, chisel, plane, cut pearl with a jigsaw…and I bet you’d have a hard time distinguishing my work from a CNC machined product. But doing things manually means you’re much slower, making maybe one instrument for yourself; it’s extremely time consuming. Manually produced instruments wouldn’t be marketable for competitive prices, or you’d have to subsidize your work. Taking into account cheap production from China, one could never make a living making handmade quality musical instruments… and even if you did make quality instruments in that way, nobody would know that you exist.
 On the other hand, my philosophy is not ‘mass production by hook or by crook.’ I still want to remain involved in production, and I insist that every instrument that leaves our workshop goes through my hands. Our workshop consists of only three people, and our yearly production is between 50– 70 instruments, depending on the model and how elaborate the appointments are. Our production totals have only increased slightly since we began using CNC, but today we have more time to pay attention to precise manual finishing, sanding, and fine-tuning our instruments the way our customers give us credit for.
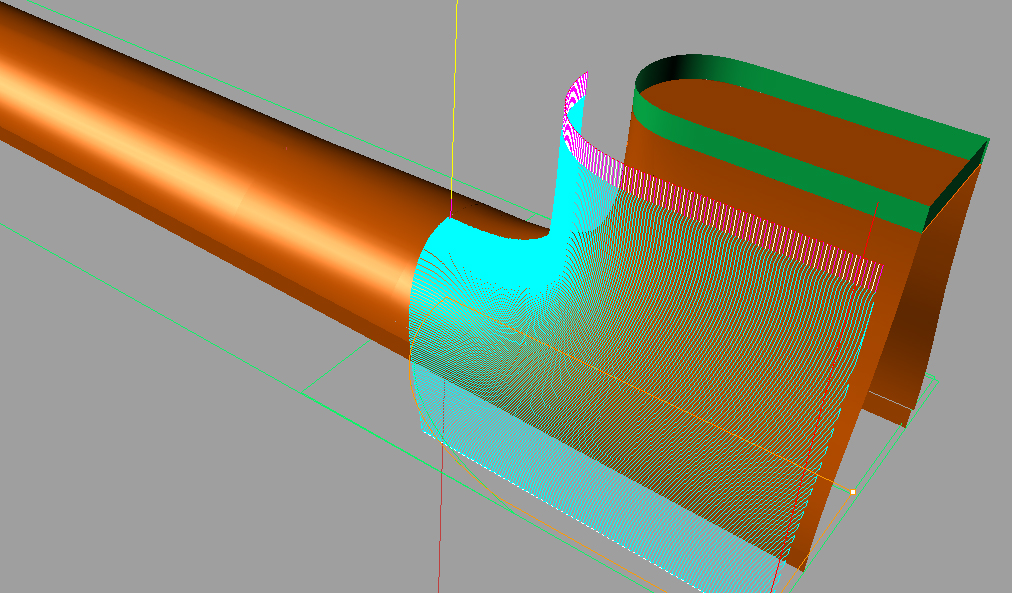
These modern technologies have influenced our craft in many ways. It’s also important to know that if you want to earn money, you have to work manually during the day and sit by the computer at night and create 2D or 3D models followed by countless tests. And then success may come, and maybe you’ll be satisfied. Designing and manufacturing the clamping tools is another chapter. Milling on CNC sometimes takes more time then manual milling, but in recurrent mass production the CNC model and program pay off. The key prerequisite for employing this machinery is the initial cost of CNC and the software. (And then you have to learn to use it.)
Selecting the right modelling program depends on the CNC machine you decide to purchase. Every CNC manufacturer recommends certain software but it’s up to every individual which program suits them best. When I decided to buy a CNC machine I had zero knowledge about CNC and making 2D or 3D models; no idea how complicated the task was before me. After purchasing the CNC, and after several unsuccessful attempts, I realized I needed help making the neck models. I did some research and realized that, unfortunately, no one in the Czech music industry could help me with CNC. I decided to employ a young student, Matej Kudlicka, who worked part time in our workshop and had certain skills with AutoCAD SW. We tested several designing SW programs until we found the one that met our requirements and was user friendly. Finally, we had to acquire a program that enables curve transfer into tool paths.
Matej worked full-time for almost a year making the basic neck and inlay models. During that year I didn’t work in our workshop; I spent all my time helping Matej, testing programs, explaining what to change or how I needed certain things done until we were both satisfied with the results. It’s been almost eight years since then but this process still isn’t done; there’s always room for improvement. Personally, I’ve been “fighting” with modelling programs for four years, trying to learn and master what Matej has designed. It’s a discipline that I’ve fell in love with; I like challenges. I have no problem spending all night at the computer making a program that I need. And to think I once considered computers arch enemies.
About four years ago I approached famed banjo player Alison Brown with an idea—after her many years of endorsing our banjo (the Diamond Point model), we would be honored to design and build a signature Prucha model for her. I was more than pleased when she agreed—creating a model for such a recognized artist was a dream come true. But try to come out with a new banjo design! Every imaginable shape, contour or pattern has been used at least once! I hadn’t realized exactly what I was promising…. I didn’t intend to change the banjo’s basic construction or put in a new tonering, but instead to create a new peghead contour and new original inlays. Sounds easy…but I found out very quickly that it wouldn’t be.
The first and dominant requirement came from Alison’s husband, Garry West—he specified that the peghead should be more robust then my standard design. Initially, I considered this nonsense. Later, however, I found that a bigger peghead could substantially influence a complete re-design of the instrument. After giving it some more thought I remembered that prewar Gibson top-tension banjos featured a specific sound —a result of using a massive and heavy resonator, and a revolutionary tension hoop that facilitated adjusting the skin head by a wrench without the need to unscrew the resonator—the design that is still highly admired today. The hoop weighed almost two times more than the standard notched tension hoop. But aside from these obvious features, I’m convinced that their bigger pegheads also added to the distinctive, warm sound of top-tension banjos. A few years ago, the stellar picker Noam Pikelny started a bit of a top-tension craze. Everyone who saw Noam with his prewar Style 7 Gibson was intrigued by those weird looking adjustment screws… and its robust guitar-like peghead!
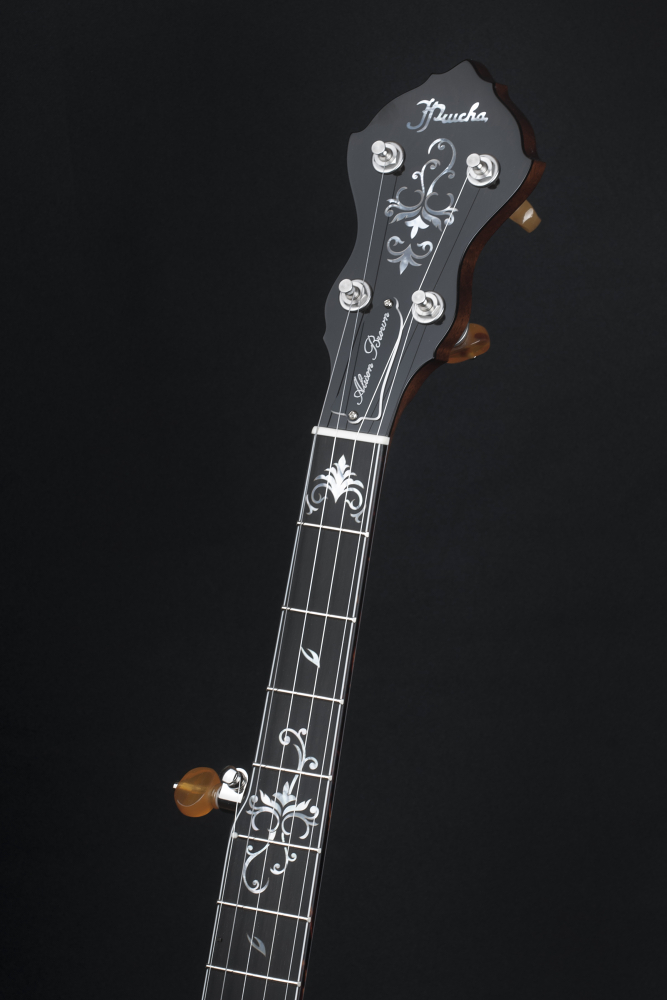
I wanted to change my peghead outline. The limits of tolerance for a new peghead design are narrowed by the conservative conceptions of bluegrass players and fans who revere the classic Gibson designs; maybe only a few of them are willing to credit Geoff Stelling with designing a different but elegant peghead shape. I’m a huge fan of Stelling banjos and I’m proud to call Geoff a longtime friend. In my project, I didn’t want to completely deviate from our original Prucha peghead design. In my 3D modelling program I modified the outlines of the Prucha peghead, mainly in the middle part. I wanted to preserve our characteristic proportions, primarily in the section where the peghead meets the neck or keeping distance between tuning pegs, etc. These modifications would affect the production process.
Out of many different peghead shapes, we had made a shortlist of six that my son, Jan, and I, considered the best, and eventually we selected the “winner.” Finally, I was satisfied. I’m glad we made a unanimous decision, because Jan has a great feel for design and I can fully rely on his assessment. The project continued with CNC mill routine procedures—clamping of material, calculation of tool paths and test runs of milling speeds and shifts on CNC. After finishing several peghead samples, we were satisfied.
The next step was creating the original inlay designs for the peghead and fingerboard. Fortunately, Jim Mills’s great book, “Gibson Mastertone Flathead Fivestring Banjos” hit the market at about that time. I got a copy and began reading…a beautiful publication that every banjo enthusiast should have. In the book, the author used several decorative patterns that caught my eye. I thought these drawings could be used as a basis for my own inlay design. But this was a task for Matej, who spent endless hours working on reshaping the basic lines and contours into new inlay patterns. It seems like it would be easy if you had the basic idea, but believe me, it isn’t! He sent me every pattern for approval, and me and my son tried to finalize every line or contour in the modelling program. The “retouched” drawings were sent back to Matej and he finalized the design of basic inlay patterns. Try it yourself— take a standard inlay pattern and make a small change in radius, rotate an arch or incision, modify the picture by enlarging or trimming. Then place the adjusted pattern between frets on the fingerboard or on the peghead. You’ll probably have to do it repeatedly, because you’ll see right away that something is wrong…the pattern too fat or too delicate, doesn’t correspond with the adjacent patterns, doesn’t fit proportionally between the holes for tuning pegs, it’s not elegant, etc. It is meticulous work and you often have to start over from scratch. Originally, I wanted one inlay design but during the project I found that the patterns are quite universal and we could combine them. That is why we came up with the whole new line of banjos. We had to make a decision what to name it and we thought that “Spirit” fit. One year of hard work began to pay off.
The basic Spirit pattern was prepared. Matej designed the full fingerboard inlay, but I knew it would be too much for Alison. I spent several nights gradually relocating and fine-tuning the patterns…and ended up with a simple and delicate design. I was pretty sure that when Alison checked the photos of finished fingerboards, she would Brandon Greene model, Spirit line Alison Brown model, Spirit line pick this modified one. Also, during my work on fingerboard design I unintentionally put together another inlay pattern that I really liked. So eventually we had three original inlay patterns. After inserting the pearl inlays into the fingerboards and peghead plates, we knew we had finished our homework. The new “Spirit” banjo line was born…inlays and peghead shape respecting tradition and convention. Not too modern but still fresh and novel, exactly how we had planned.
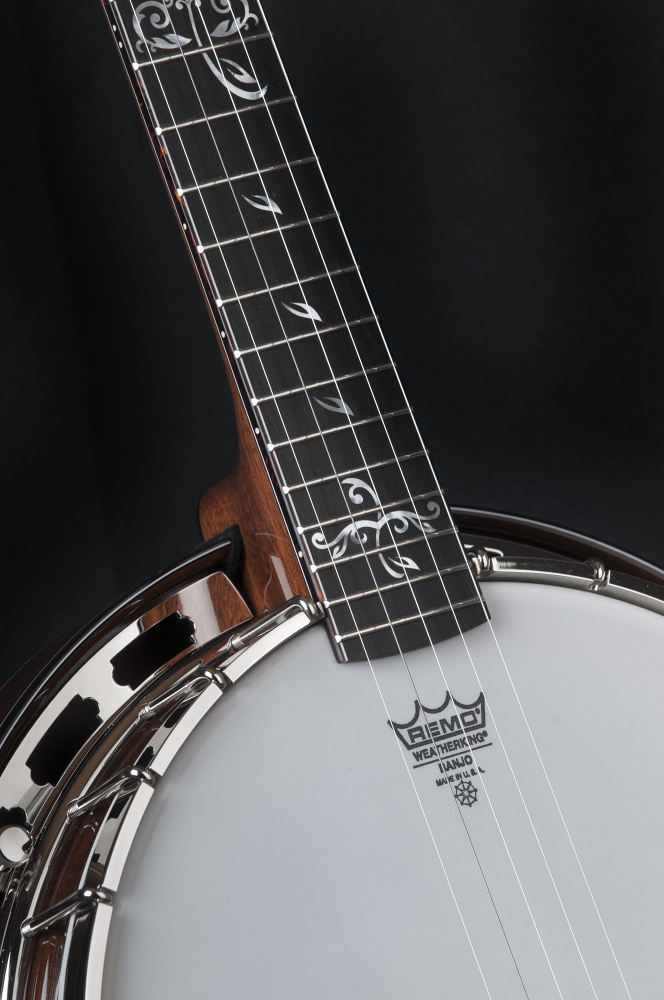
We made basically no changes in the construction. I generally think that our necks are fine; our customers seem to like the design and profiles. The scale is standard. Logically, I wanted to use our signature massif resonators as well as our reissue pot metal one-piece and two-piece flanges, classic flathead tonering, and also, an optional 24 fret fretboard— another feature popularized by Noam Pikelny. The first banjo from our new line that we made was the basic “Spirit” model. We used curly maple accentuated by tobacco brown finish, radiused ebony fingerboard, standard plywood resonator, multiple ivory binding; the standard pot construction with flathead ring and our reissue pot metal onepiece flange…logically, also featuring our new peghead shape and Spirit inlays in white pearl. I think it is a spectacular model with full fingerboard inlay and full, solid sound. It should appeal to those who admire elaborate, full neck inlays and enjoy melodic runs up and down the length of the fingerboard without a need to watch the position marks.
The second Spirit model features a wider fingerboard bound with a three-ply tortoise stripe. Flamed maple was accentuated by the dark orange-brown sunburst finish. It’s flat fingerboard seems to be the preference of traditional bluegrass pickers. We set it up with light strings, head tuned a little higher (up to A), and the tailpiece tightened closer to the head. This model was dedicated to our longtime endorser, teacher, and great person [and Winfield winner], Brandon Green.
The Alison Brown model that actually initiated the project is slightly different. I wanted to create a banjo that projects a sound which is not that sharp, has less sustain and better tone separation; a mellow tone with accentuated bass range. That’s why we chose mahogany, a massive resonator in tobacco brown finish, and understated tortoise threeply binding. The radiused fingerboard is slightly wider; it measures 1.3 inch at the nut and features 24 frets with an extension over the head. The two-piece flange adds to the “shorter” tone. Subtle pearl inlays underline the robust size of the new peghead design. Inlays are placed at standard fret positions. I’m glad that Alison fell in love with this design, and I sincerely hope this banjo will become Alison’s soulmate in her own, distinctive music world as well as a tool for ripping classic, harddriving bluegrass licks. I’m sure it will become our most popular model.“Jarda has knocked it out of the park,” writes Alison Brown. “The craftsmanship is impeccable, the neck feels great and the tone is big and warm. And, it’s the prettiest banjo I’ve ever owned.”
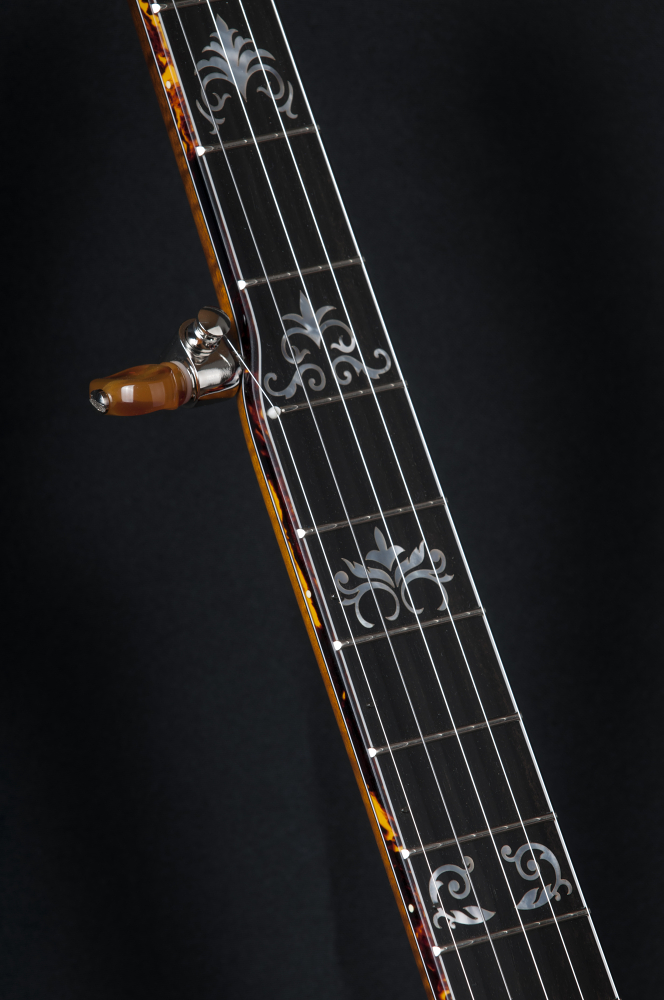
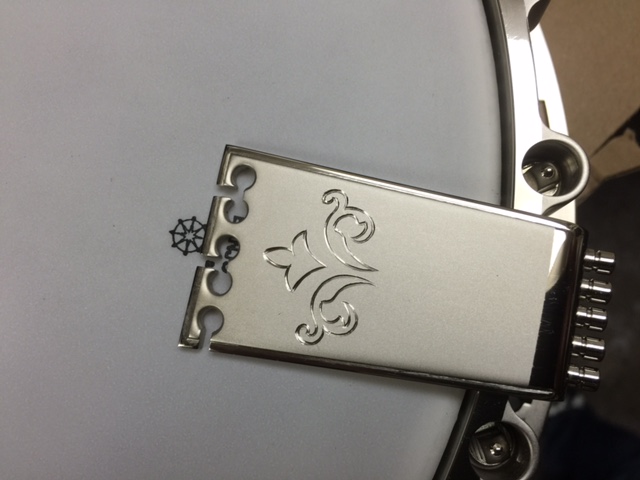
We created one more Spirit model — the Jason Burleson. We wanted to introduce a top-tension banjo based on a classic design with simple pearl ornamentation, but also showcasing some novelty elements. It features a radiused, 24 fret, standard width extended fingerboard and a “speed neck” (the wood is without lacquer and is only lightly cured and polished with honey wax), with a massive resonator and our new one–piece flange. The finish on the metal parts is half shiny/half matt, sand blasted nickel plated parts are engraved with patterns corresponding with the peghead and neck inlays. This mahogany banjo is fitted with a sand blasted and engraved Kershner tailpiece; the maple bridge with ebony plate is also radiused. This instrument is suited for both hardcore bluegrass players as well as musicians exploring modern approaches. It delivers typical top-tension sound, and was created with help from Blue Highway’s Jason Burleson.
The new line of Spirit banjos, and the onepiece flange project [as featured in the March 2015 BNL], kept us busy for more than a year. It was exhausting and painstaking work. After introducing the new banjos and flange at IBMA in Raleigh last October we also finally managed to put our new products on our web page. I’m curious whether our efforts will gain attention and positive feedback. We’re getting ready to exhibit at Frankfurt Music Messe in Germany and after that at Merlefest in USA. I can’t wait to see you folks at our booth and hear you giving my new banjos a trial run!
Sincerely, Jarda Průcha and the Prucha Bluegrass Instruments Team (article assembled with help from Martin Mikulas)
Sincerely, Jarda Průcha and the Prucha Bluegrass Instruments Team (article assembled with help from Martin Mikulas)
Additional comments by banjo pickers who endorse Prucha continued online at www. banjonews.com
Brandon Greene: In the summer of 2006, I was playing with the Abrams Brothers in Europe. One stop was EWOB (European World of Bluegrass) in the Netherlands. It was there that I met Jaroslav. I really liked his banjos for their balance in tone. There was plenty of punch (high end) but they also had such richness and depth (mids and lows). When we weren’t performing, I hung out at the Prucha booth and just jammed on his banjos. I ordered one and started playing a maple Prucha Diamond Point in 2007. I played that banjo until 2012. That’s when I received my maple top-tension Prucha. I custom ordered it with a copper patina finish, Prucha-style inlay, radius fingerboard, solid resonator, tortoise binding, and a thick speed neck. I later put Keith tuners on it. This banjo is a bit brighter and maybe louder than my first Prucha. I believe the top tension adds a bit more highs to the tone. I’m anxiously waiting my signature model which will be completed in April 2015. It will be mahogany (standard Brandon Green model is maple I believe), Prucha’s new custom designed inlay, a little wider fingerboard and slightly more radius (similar to Bela’s set up), nickel plated, standard tension (not top tension), ply resonator, crowe spacing bridge, speed neck, Keith tuners, 24 fret, little less thick neck, lighter laquer all over, high bridge, wood armrest, clamshell tailpiece (some of these things are custom to my request; probably not on all Brandon Green models). It’s been an enormous privilege to get to know Jaroslav and play his instruments. He is a master luthier. His talent, craftsmanship and attention to detail are amazing.
Tony Furtado: I’ve known Jarda for 25 years. He has always made top notch banjos, but when I played the banjos he displayed at last years “Five String Festival,” I was hooked! The banjo I settled on is all mahogany, 24 frets, radius fingerboard and a very simple diamond point inlay pattern. The tone is warm, but has a nice puncht. Honestly, it sounds exactly the way it looks—dark and woody with a little bit of a sheen! Its great for what I do, whether I’m playing an intricate instrumental or just backing my vocals